
[ad_1]
Proteins control many biological processes, such as enzyme activity, molecular transport, and cellular support. The three-dimensional structure of a protein provides insight into how it interacts with other biomolecules. Experimental methods for protein structure determination, such as X-ray crystallography and NMR spectroscopy, are expensive and time-consuming.
In contrast, recently developed computational methods can quickly and accurately determine the structure of a protein from its amino acid sequence. These methods are critical for proteins that are difficult to study experimentally, such as membrane proteins, the targets of many drugs. One famous example of this is AlphaFold, a deep learning-based algorithm known for its accurate predictions.
ESMFold is another highly accurate deep learning-based method developed to predict the structure of a protein from its amino acid sequence. ESMFold uses the Large Protein Language Model (pLM) as the backbone and works end-to-end. Unlike AlphaFold2, it does not require search or multiple sequence alignment (MSA), nor does it rely on external databases to generate predictions. Instead, the development team built the model on UniRef’s millions of protein sequences. During training, the model developed patterns of attention that elegantly represent evolutionary interactions between amino acid sequences. This use of PLM instead of MSA provides up to 60 times faster forecasting than other state-of-the-art models.
In this post, we use the pre-trained ESMFold model from Hugging Face with Amazon SageMaker to predict the heavy chain structure of trastuzumab, a monoclonal antibody first developed by Genentech to treat HER2-positive breast cancer. Quickly predicting the structure of this protein could be useful if researchers wanted to test the effects of sequence changes. This may lead to improved patient survival or fewer side effects.
This post provides an example of a Jupyter notebook and related scripts in the following GitHub repository.
prerequisites
We recommend running this example in an Amazon SageMaker Studio notebook running PyTorch 1.13 on a Python 3.9 CPU-optimized image of ml.r5.xlarge instance type.
Visualization of the experimental structure of trastuzumab
To begin with, we use biopython Library and helper script to download trastuzumab structure from RCSB Protein Data Bank:
Next, we use py3Dmol A library for visualizing the structure as an interactive 3D visualization:
The following figure represents the 3D protein structure of 1N8Z from the Protein Data Bank (PDB). In this image, the trastuzumab light chain is shown in orange, the heavy chain is blue (with the variable region in light blue), and the HER2 antigen is green.
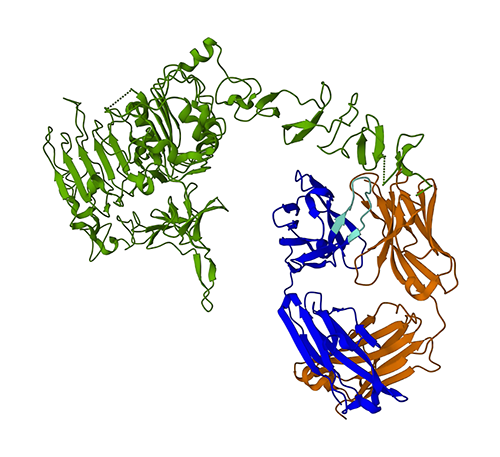
We will first use ESMFold to predict the structure of the heavy chain (chain B) from its amino acid sequence. Next, we compare the prediction with the experimentally determined structure shown above.
Predict the structure of trastuzumab heavy chain from its sequence using ESMFold
Let’s use ESMFold model to predict heavy chain structure and compare with experimental result. To get started, we’ll use the pre-built notebook environment in Studio, which comes with some important libraries, such as PyTorch, pre-installed. Although we could use an accelerated instance type to improve the performance of our notebook analysis, we will instead use a non-accelerated instance and use the ESMFold prediction on the CPU.
First, we load the pre-trained ESMFold model and tokenizer from Hugging Face Hub:
Next, we copy the model to our device (in this case the CPU) and set some model parameters:
To prepare a protein for sequence analysis, it needs to be tokenized. This translates the amino acid symbols (EVQLV…) into a numeric format that the ESMFold model can understand (6,19,5,10,19,…):
Next, we copy the tokenized input to the routine, make a prediction, and save the result to a file:
This takes about 3 minutes on a non-accelerated instance type like r5.
We can test the accuracy of the ESMFold prediction by comparing it to the experimental structure. We do this using the US-Align tool developed by the Zhang Lab at the University of Michigan:
| PDBchain1 | PDBchain2 | TM-score |
| data/prediction.pdb:A | data/experimental.pdb:B | 0.802 |
The template modeling score (TM-score) is a metric for evaluating the similarity of protein structures. A score of 1.0 indicates a perfect match. Scores greater than 0.7 indicate that the proteins have the same backbone structure. Scores greater than 0.9 indicate that the proteins are functionally interchangeable for downstream uses. If a TM-Score of 0.802 is achieved, the ESMFold prediction is likely to be suitable for applications such as structure scoring or ligand binding experiments, but may not be suitable for use cases such as molecular replacement that require extremely high accuracy.
We can confirm this result by visualizing the aligned structures. The two structures show a high but not perfect degree of overlap. Protein structure predictions is a rapidly evolving field, and many research teams are developing more accurate algorithms!
Deploy ESMFold as a SageMaker inference endpoint
Running model inference in a notebook is fine for experimentation, but what if you need to integrate your model with an application? Or the MLOps pipeline? In this case, a better option is to place your model as an inference endpoint. In the following example, we deploy ESMFold as a SageMaker real-time inference endpoint on an accelerated instance. SageMaker real-time endpoints provide a scalable, cost-effective and secure way to deploy and host machine learning (ML) models. With auto-scaling, you can adjust the number of instances running an endpoint to meet your application requirements, optimizing costs and ensuring high availability.
The pre-built SageMaker container for face-hugging makes it easy to apply deep learning models to common tasks. However, for new use cases such as protein structure prediction, we need to define custom inference.py A script to load the model, run the prediction, and format the output. This script includes the same code we used in the notebook. We also create a requirements.txt file to define some Python dependencies for our endpoint to use. The files we created can be found in the GitHub repository.
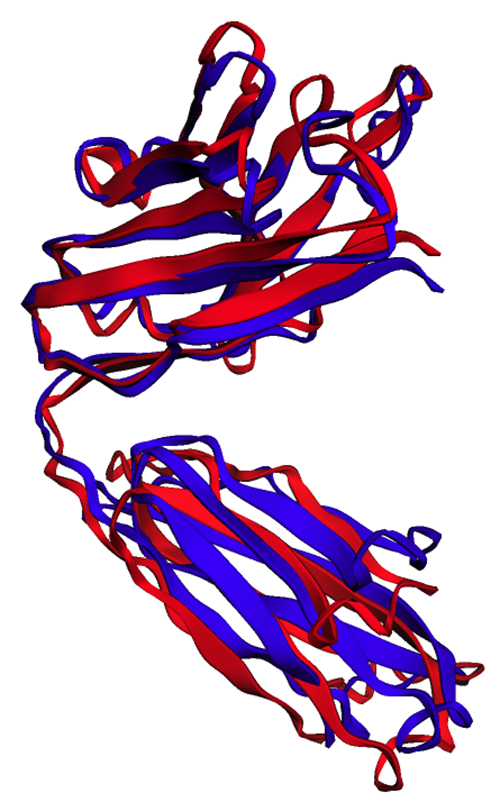
In the following figure, the experimental (blue) and predicted (red) structures of the trastuzumab heavy chain are very similar, but not identical.
After we have created the necessary files code In the directory, we deploy our model using SageMaker HuggingFaceModel class. This uses a pre-built container in SageMaker to simplify the process of deploying Hugging Face models. Note that it may take 10 minutes or more to create an endpoint, depending on availability ml.g4dn Types of examples in our region.
When the endpoint alignment is complete, we can resubmit the protein sequence and display the first few lines of the prediction:
Because we placed our endpoint on the accelerated instance, the prediction should only take a few seconds. Each row of the result corresponds to a single atom and includes the amino acid identity, three spatial coordinates, and a pLDDT score representing the confidence of the prediction at that location.
| PDB_GROUP | ID | ATOM_LABEL | RES_ID | CHAIN_ID | SEQ_ID | CARTN_X | CARTN_Y | CARTN_Z | Detention | PLDDT | ATOM_ID |
| atom | 1 | N | GLU | A | 1 | 14.578 | -19.953 | 1.47 | 1 | 0.83 | N |
| atom | 2 | CA | GLU | A | 1 | 13.166 | -19,595 | 1.577 | 1 | 0.84 | C |
| atom | 3 | CA | GLU | A | 1 | 12.737 | -18.693 | 0.423 | 1 | 0.86 | C |
| atom | 4 | CB | GLU | A | 1 | 12.886 | -18.906 | 2.915 | 1 | 0.8 | C |
| atom | 5 | O | GLU | A | 1 | 13.417 | -17.715 | 0.106 | 1 | 0.83 | O |
| atom | 6 | kg | GLU | A | 1 | 11.407 | -18.694 | 3.2 | 1 | 0.71 | C |
| atom | 7 | cd | GLU | A | 1 | 11.141 | -18.042 | 4.548 | 1 | 0.68 | C |
| atom | 8 | OE1 | GLU | A | 1 | 12.108 | -17.805 | 5.307 | 1 | 0.68 | O |
| atom | 9 | OE2 | GLU | A | 1 | 9.958 | -17.767 | 4.847 | 1 | 0.61 | O |
| atom | 10 | N | VAL | A | 2 | 11.678 | -19.063 | -0.258 | 1 | 0.87 | N |
| atom | 11 | CA | VAL | A | 2 | 11.207 | -18.309 | -1.415 | 1 | 0.87 | C |
Using the same method as before, we see that the notebook and endpoint predictions are identical.
| PDBchain1 | PDBchain2 | TM-score |
| data/endpoint_prediction.pdb:A | data/prediction.pdb:A | 1.0 |
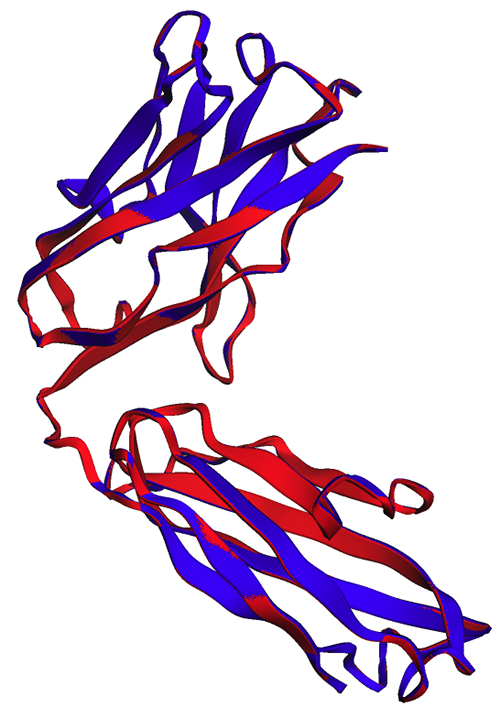
As can be seen in the following image, ESMFold projections (red) and endpoints (blue) generated in the notebook show perfect alignment.
Cleaning
To avoid additional charges, we delete the conclusion endpoint and test data:
Summary
Computational prediction of protein structure is a critical tool for understanding protein function. In addition to basic research, algorithms such as AlphaFold and ESMFold have many applications in medicine and biotechnology. The structural insights generated by these models help us better understand how biomolecules interact. This could lead to better diagnostic tools and therapies for patients.
In this post, we demonstrate how to deploy the ESMFold protein language model from the Hugging Face Hub as a scalable inference endpoint using SageMaker. For more information about using Hugging Face models on SageMaker, see See Using Hugging Face with Amazon SageMaker. You can also find more protein science examples in the Awesome Protein Analysis AWS GitHub repo. Please leave us a comment if there are other examples you’d like to see!
About the authors
 Brian Loyal is a Senior Architect of AI/ML Solutions in the Global Healthcare and Life Sciences team at Amazon Web Services. He has over 17 years of experience in biotechnology and machine learning and is passionate about helping customers solve genomic and proteomic challenges. In his free time, he enjoys cooking and eating with friends and family.
 Shamika Aryavansa is an AI/ML Specialist Solutions Architect in the Global Healthcare and Life Sciences team at Amazon Web Services. He is passionate about working with customers to accelerate their AI and ML adoption with technical guidance and helping them innovate and build secure cloud solutions on AWS. Outside of work, he likes skiing and off-roading.
 Yanjun Qi is a senior manager of applied science at the AWS Machine Learning Solution Lab. He innovates and uses machine learning to help AWS customers accelerate AI and cloud adoption.
[ad_2]
Source link